Embracing Z-Wave Technology: My Journey with the Z-Box Hub Device

As a home automation enthusiast, I’ve come a long way in the past two decades. I began with X10 powerline controls, transitioned to Wi-Fi and cloud-based controllers from Tuya/Smartlife and Brilliant/Aqara, and finally, I’ve now integrated the Z-Box Hub (or as I like to call it the Zhub device) into my Ubiquiti UniFi system. The journey was exciting and challenging, but the results were incredibly rewarding.
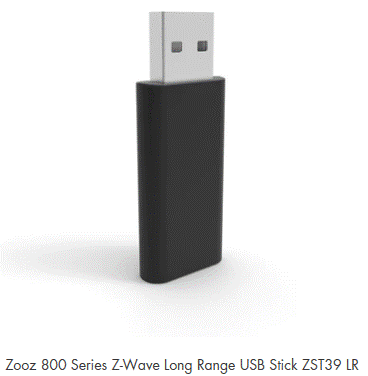
After installing the Zhub last weekend, I was instantly impressed by the superior local control it offered. I use a hybrid solar/battery/grid power system and rely on IoT to manage local loads during peak cost hours. With Home Assistant running on an Oracle VBox (equipped with an 800 Z-Wave USB stick in one of its virtual ports), I can now enjoy super-fast local control. This has eliminated the days of slow or broken scenes due to IEEE TCP or UDP communication queues.

One aspect of the Zhub device that I genuinely appreciate is the focus on security and privacy. The Z-Wave S2 security protocol, along with the ability to operate the system 100% offline, ensures that my smart home remains safe from potential hacks. The seamless accessibility provided by the Z-Box’s intuitive scene builder has made the process of creating and managing automation rules a breeze. Furthermore, having the support of both Zooz and Fibaro has been invaluable, with Zooz’s focus on user experience and Fibaro’s expertise in Z-Wave implementation.

Regarding the challenges mentioned in the original blog post, while it’s true that the Zhub doesn’t come with a Zigbee chip, I’ve found that using a Zigbee bridge with Quick App plug-ins works well for integrating Zigbee devices. As for the full programming being available on the web only, I understand that the mobile app is designed as a companion tool, and I’ve had no issues creating rules and automations through the WEB UI. I look forward to future updates to the app that may introduce more features for users like myself. [Contrary to the original blog post on https://www.thesmartesthouse.com , I was able to locate an FCC ID for the Z-Wave/Zigbee silicon chip in the Zhub, which indicates that the device does have built-in Zigbee capabilities. This further adds to the versatility and convenience of the Zhub.]

The main challenge I faced while integrating the Zhub was its OS drawing I/O from various non-USA countries. My network is highly secure, so I had to open routes to the IP/Mac addresses of the Zhub and the devices running the software. Additionally, I needed to open several ports. While not a problem per se, this certainly falls into the challenge category.

My Zhub came with a Z-Wave/Zigbee chip and WiFi, but I opted for the additional LAN port. I highly recommend investing in this feature as it future-proofs your system by providing dedicated connectivity. You’ll enjoy super-fast communication without the hassle of dealing with SSIDs, pre-shared keys, and IoT networks.

Lastly, I truly appreciate the Smartest House, Fibaro and Zooz for their customer support . They have been responsive and helpful throughout my journey with Z-Wave technology.

In conclusion, the Zhub device has revolutionized my home automation experience, offering fast, reliable control and mesh capabilities. Though there were a few challenges along the way, the benefits far outweigh any minor obstacles. If you’re considering upgrading your home automation system, I highly recommend giving the Zhub and Z-Wave technology a try.

Working Around Possible Lockout on UniFi Amplifi…lost Password to WiFi

We had a call from a vacation rental house owner using a UniFi Amplifi for guest access. The owner of the property had misplaced the password for the non-guest WiFi and was concerned it would need to be reset the device to gain access. Some of the devices used on the secure network are used in home automation and resetting the device would create more problems.

The Amplifi is a great solution for short term rentals because the owner can have a secure WiFi and a guest WiFi; and with the meshing for the access points the device gets great property coverage without needing to allow a physical connection to the device. The downside to Amplifi is that it needs a bridged or open connection to the Internet; and it can only be administered effectively with an IoS or Android app.

We found a nice workaround to the owner’s problem.

But it took a couple of tries to get into the device. Fortunately, we did have access to the master password for the device.

Also, the remote access from the Internet wasn’t working because they had the device behind a non-bridging firewall without a double NAT.

We started by plugging an ethernet-to-USB to a laptop and plugged into network ports on the Amplifi. On the first try using the master password we were able to access the web interface. But unfortunately, the Amplifi web interface doesn’t allow access to reset the WiFi passwords.

On the next try we moved the ethernet-to-USB dongle from laptop to a Samsung Android phone. Using the Amplifi app and the master password we were able to directly access the WiFi settings – view the WiFi password. No resets required. Very happy clients.

We couldn’t find this solution anywhere in the UniFi community pages.

Using OnSip™ with UniFi™ Firewall & Traffic Management (Network 7.1.68)

As of July 2022, several of our clients are using the cloud based OnSip Voice Over IP virtual private branch exchange phone system. OnSip was purchased by Intrado a while back and post-merger their customer service is still outstanding & the technical support is great. The level of uptime and reliability for all of our clients at their main offices and remote sites remains excellent.

Recently we have moved our clients from the UniFi Security Gateway Pro 4 on our AWS virtual controller over to the UniFi Dream Machine Pro (and the UniFi Dream Machine SE) on the UniFi Portal/Network. We are moving most of our clients into the UniFi Portal/Network and have started using the UID because it supports our NIST 800-171 and CMMC Level 1 missions.

Last week we had an issue at a client site which was causing unusually poor quality of service with OnSip. We researched several possibilities and tried many of the technical support suggestions; we even considered possible network to network issues or latency. We were able to return the quality of service by reverifying and/or making the following changes:

1. Identifying VOIP devices in the network by IP address
2. Creating a Profile for the VOIP Devices
3. Creating a Profile for the OnSIP CIDRs
4. Adding Specific Firewall Rules
5. Creating Traffic Routes (New Feature)
6. Creating New Rules in Traffic Management (New Feature)
7. Other quality measures

Here are the step-by-step instructions for ensuring a high quality of service for OnSip on your new UniFi Dream Machines.


Assign each telephone device a Static IP:

Select This Icon
Make note of IP Address
  1. Client Devices
  2. Select Device then Settings
  3. Give the device a name you can easily recognize in the list as being either a phone or part of the VOIP system.  This WILL be important in the Traffic Management section.
  4. Select Use Fixed IP Address
  5. Make note of the IP address
    • Advanced: Instead of assigning an address range in an existing network, you could create a new network, subnet and VLAN. This would help for quickly identifying the network instead of individual devices in the Traffic Rules setup.
  6. Apply the Changes

Enter the Settings:
1. Select Profiles
2. Create New Group OnSipPhones with Type IPv4 Address/Subnet
3. Add as many addresses as you have phones – this is the information gathered in the initial step.  Enter local IP Address in the Address box then click +Add
4. Apply the Changes

  1. Create a New Group OnSIPCIDR with Type IPv4 Address/Subnet
  2. Add at least these internet IP addresses
    • 199.7.172.0
    • 199.7.173.0
    • 199.7.174.0
    • 199.7.175.0
    • 199.7.175.104
    • 199.7.173.101
    • 199.7.172.27
    • 199.7.175.102
    • 199.7.172.128
  3. Apply the Changes

Select Firewall & Security
1. Scroll to Firewall Rules
2. Click Create New Rule (1st)
3. Type Internet In with Description OnSIPWANin Before Predefined Rules, Accept, All
4. Source. Source Type Port/IP Group, IPv4 Address Group OnSIPCIDR, Port Group Any
5. Destination. Destination Type Port/IP Group, IPv4 Address Group OnSipPhones, Port Group Any.
6. Leave Advanced as Auto
7. Apply Changes
Create a New Rule (2nd)
1. Type Internet Out with Description OnSIPWANOut Before Predefined Rules, Accept, All
2. Source. Source Type Port/IP Group, IPv4 Address Group OnSipPhones, Port Group Any
3. Destination. Destination Type Port/IP Group, IPv4 Address Group OnSIPCIDR, Port Group Any.
4. Leave Advanced as Auto
5. Apply Changes

Enter Traffic Management

  • Create a Traffic Route
    • Category: IP Address
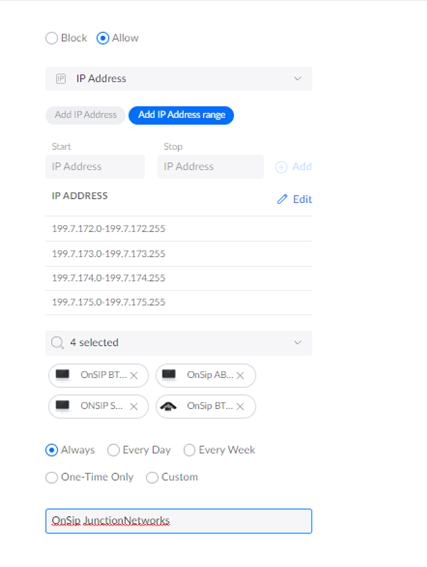
    • Click Add IP Address range enter and add the Junction Network CIDR ranges between 199.7.172.0 through 199.7.175.255.  Unifi will NOT accept the 199.7.172.0/22 format.  Follow this pattern:
      • Start 199.7.172.0 Stop 199.7.172.255
      • Start 199.7.173.0 Stop 199.7.173.255
      • Start 199.7.174.0 Stop 199.7.174.255
      • Start 199.7.175.0 Stop 199.7.175.255
    • On the Source Dropdown select each individual device in the OnSipPhones group.  There is no way in this version to select a group profile so you will need to select each device one-by-one. Powertip: Include the admin PC in the source if you are going to run VOIP diagnostics from that machine to Junction Networks (OnSip/Intrado)
      • Advanced: If you had put the IP phones on their own network / VLAN there is the possibility of selecting by network profile instead of device.
    • Select Default (WAN1) as your Interface (Advanced: unless you are using a different Internet source)
    • Give it the Description Junction Networks
    • Add the Route
  • Create a New Rule (in Traffic Management)
    • Action: Allow
    • Category: IP Address
    • Click Add IP Address range enter and add the Junction Network CIDR ranges between 199.7.172.0 through 199.7.175.255.  Unifi will NOT accept the 199.7.172.0/22 format.  Follow this pattern:
    • Start 199.7.172.0 Stop 199.7.172.255
    • Start 199.7.173.0 Stop 199.7.173.255
    • Start 199.7.174.0 Stop 199.7.174.255
    • Start 199.7.175.0 Stop 199.7.175.255
    • On the Source Dropdown select each individual device in the OnSipPhones group.  There is no way in this version to select a group profile so you will need to select each device one-by-one. Powertip: Include the admin PC in the source if you are going to run VOIP diagnostics from that machine to Junction Networks (OnSip/Intrado)
    • Schedule is Always
    • Give it the Description OnSip Junction Networks
    • Add the Rule

Your Traffic Management Section should look something like the image:


In the UDMP Firewall Security Tab you should now be able to leave the H.323 box selected. Be sure that SIP is deselected.

Coming Soon…Learning Home Automation

We are in the process of learning how to integrate the different IoT and home automation tools available to businesses and consumers. Couple of false starts and a number of success stories to tell you about.

Be sure to check back in mid 2022 to begin reading our series of how to get started and become successful with your home automation.

Also, on the blog schedule:

  • a comparison of NETGEAR READYNAS+™ (OS6) vs Synology 1520+™….
  • Ubiquiti’s Unifi Dream Machine Pro™ VS Unifi Dream Machine SE™
  • Ubiquiti’s UID™ and UI Access™
  • Why I buy Dell™ products at home and at work
  • a guide to TrendMicro™ mobile, cloud services, email protection and end point protections
  • Some cool and new ways to handle workflow on the Hexagon Leica Cyclone software and LiDAR scanners using Microsoft Office / 365
  • Some cool and new ways to host IDIS ISS on Amazon Web Services (AWS)

If you need information now on any of the topics, please submit a Contact through the website https://www.asproj.com

Suggestion on Ubiquiti UniFi Controller Versions – July 2018

We use the Ubiquiti UniFi Controller (now in version 5.8.24 stable candidate release) to run our networks. Our best practice suggestion is to have 2 virtual machines – a production and a development role which alternate after each release – and then use a DNS service such as DYN for assigning the active machine to be the controller.

Of course, Ubiquiti always recommends a backup before versioning up and this is wise advice.  However my experience is that sometimes you don’t recognize what is going wrong until you are into the new build for a couple of days.  So we have worked our way around that problem by creating two (2) virtual Windows environments at Amazon EC2 space.  The method we followed was to create 2 equal environments – Windows, Java, UniFi controller 5.7.23 running identical management sets of data; and then we updated one of the machines to 5.8.24; after the update and testing the machine we updated the DYN software to point to the updated UniFi controller.  The DNS update by DYN is not instantaneous so we left the 5.7.23 machine running for 48 hours before turning off the controller and the virtual machine.  We took a baseline backup of both 5.7.23 and 5.8.24 machines post upgrade.

The development machine (now the 5.7.23) will remain off while we test the production (now the 5.8.24) machine.  Assuming everything goes as planned the next stop for the 5.7.23 machine will be an upgrade to the next stable candidate release after 5.8.24; and then the present 5.8.24 machine will become the development machine.

By spinning up the 2nd virtual machine we have made rollbacks of stable release candidates possible by simply changing the DNS information.

Contact us for more information or search YouTube for useful information from my internet heroes – Crosstalk Solutions and Willie Howe (H2)

P.S. Be sure to use complicated and lengthy passwords.  My personal advice use a password generator to generate both your username and your password.  And go for the complicated passwords 15+ characters of alphanumeric and special characters.  And always use two factor authentication if it is offered.

Telephone Number Lookup

I recently needed to run a reverse lookup on a couple of telephone numbers.  This used to be very difficult in the old days (read this as before the Internet and even last year.)  I researched online and tried a couple of sites.  The best one I have found – and joined – is powered by SafeCaller.com.  I signed up at http://www.okcaller.com.

About the only negative comment I can make about the website is that they don’t use https:// to transport the information.


Upgrading to Windows 10 – A Smooth Experience

For the past couple of months Microsoft has been urging me to upgrade my various PCs, tablets and workstations to Windows 10.  I finally relented and made the upgrade on a couple of tablets, virtual machines and a workstation.  All of the installations were completed using Cox highspeed internet (150 mbps) from the Cloud.

For the most part the installations went hitchless.

Here is the very brief list of issues that I found:

  1. The Displaylink driver on Windows 8.1 needed to be upgraded to support Windows 10 on 2 tablets.  We use this software to drive our Pluggable multi-screen displays.
  2. On a workstation we needed to upgrade an Intel Rapid Storage Technology application to a new version.  This is used to create RAIDs.
  3. We needed to upgrade Siber Systems RoboForms to the latest version.  However this upgrade failed to create a menu in Microsoft Edge the new browser.  We’re still working on a fix for this issue.
  4. Our old version of TeamViewer 9 is still running (used for personal not business purposes).  Although a weird (<–>) error appeared on the home screen, this was resolved by disabling that feature.  We need to update to v11 which will happen in 2016.
  5. Stardock Start8 kept popping up errors.  So we uninstalled this software.  We’re going to try going without by using the Windows 10 startmenu.  I’ll update you in the future if we decide to go back to Stardock.
  6. On one of the Windows 8.1 tablets the upgrade only put on Windows 10 Home.  We needed to pay $99 to upgrade to Windows 10 Pro.  Other than the expense this was easy and completed entirely through the cloud.
  7. On a Windows 10 Pro Workstation two older NVidia GeForce 9800GT cards are having driver issues at random times usually related to video playback on certain news and video websites. (New issue c. 1/2016 – Core i7 930@2.8GHz 24GB 64 bit)

I am very pleased with the upgrade of our Windows 8.1 Pro to Windows 10 Pro.  We use this on a 64 bit workstation which also has Hyper V Manager installed.  The upgrade went seamless and no changes to Hyper V were necessary.  This particular upgrade has me most concerned because we have virtual machines which control Ubiquiti WiFi authentication and running the BlueIris video software.  Other than the very brief downtime for the Windows 10 upgrade we had zero downtime on these machines.  We even updated the virtual machines to Windows 10.

On a personal security note, if you have not installed two-step verification onto your Microsoft Account yet, now is as good as time as any.  I am an Android user and I found that you can setup for both the Google Authenticator Account (by choosing ‘other’) and a Microsoft Account app (by choosing ‘android’).  This will help to prevent unauthorized third parties from accessing your Microsoft account which often contains passwords, alternate contact information and credit card information.  It takes just a couple of minutes and provide invaluable protection.  We use similar protection for our Google accounts.

The only feature that I haven’t found in Microsoft Windows 10 or Office 365 that I would really like to have is support for the FIDO U2F.  I have been told that it is in there but I haven’t figured out how to activate that yet.

Adding Skype SIP Line to Polycom VVX410

Recently a client asked about adding a Skype SIP line into their existing Polycom VVX410 VOIP telephone.  The client already uses OnSip as their virtual PBX.  They wanted to add Skype capabilities to their conference room.

I found no documentation at Polycom or on Google searches.  So for future reference here is how I added Skype to a Polycom VVX410 phone without needing a Lync server.

Steps

(assumes you have http access to phone and know the admin password and that you have already used Skype Manager to setup SIP account):

1) Access the phones web interface by going to https://myip

2) Select the Setting/Lines then select the Line that you want to add the Skype SIP address to and be certain to select a Line that is not already in use.  If you are using OnSip it can show you what lines are available…beware because it will not be able to see custom line configurations you make from this point forward.

151009 skype1

3) In Identification Enter the Display Name

4) In Address enter the Skype Connect SIP ID + “@sip.skype.com”

5) In Label enter “Skype” (or whatever you want displayed on the phone’s display)

151009 skype 2

6) In Authentication Enter the Domain sip.skype.com

7) Enter User ID which is the Skype Connect SIP ID #

8) Enter the Skype Password

151009 skype 3

9) In Outbound Proxy Address sip.skype.com

10) Port 5060

11) Transport UDPOnly

151009 skype 4

12) Server 1 Address sip.skype.com

13) Port 5060

14) ‘Save’ on Phone


This should work for outbound SIP calls.  Inbound SIP calls are received by giving out address of skpesipID#@sip.skype.com or by using a Skype account (must be managed from within Skype Manager).


For use with OnSip we created an External SIP Address and assigned an extension number.  Internal callers and callers using the AutoAttendant can now access this line.


The Skype helpline was frustrating with respect to adding forwarding information from a Skype address to Skype SIP.  Here is what you do in Skype Manager (https://manager.skype.com):

1) Create a new Account in the Create Account area

2) Once it is created log into Skype and set it up to receive call from Anyone

3) Back in the Manager select Features / Skype Connect

4) Select Incoming Line and Add A Managed Account using the name of the newly created Account

Now whoever is on Skype placing a call to that account will be forwarded to your Skype SIP account.

About the only function it appears that a Skype SIP line is incapable of performing is outbounding a call to a Skype Account.


Foscam – Windows has blocked this software because it can’t verify the publisher.

Anyone who has purchased a Foscam camera in the past couple of years has undoubtedly experienced the Windows Internet Explorer Add-on Installer Security Warning.  Here are the exact steps to get around it on Windows 8.  This blog entry will teach you how to manually expand the FSIPCam.cab file so you can manually install the .ocx file you need to operate the Foscam camera.

Windows has blocked this software because it can't verify the publisher.
Windows has blocked this software because it can’t verify the publisher.


First you need to download the .cab file to your local drive (c:\temp or c:\windows\temp).  I then created a directory/folder c:\windows\fsipcam\ to store the expanded files.  Here is how you download, type this URL ( http://IP_address/FSIPCam.cab ) into your IE URL textbox.  You will prompted by IE about what to do about the file.  You should select “Save as” and save the file to c:\windows\temp (if you can’t save there because of restrictions save to “Downloads” and then manually move to c:\windows\temp after the file downloads.)

Open up a CMD window as an Administrator.

In the CMD window you need to expand the .cab file you just downloaded so change directory (CD c:\windows\temp) and enter this command expand fsipcam.cab c:\windows\fsipcam\ -f:* (this sets the expand command to take the .cab file and extract its entire contents to the target directory \fsipcam).

Staying in the CMD window you should now change directory to \fsipcam (cd c:\windows\fsipcam).  Now is the time to register the .ocx (directx) file that you expanded from the .cab file.  Type in regsvr32 ocxipcam.ocx and hit enter.  Nothing will appear to happen.  Don’t worry it is now installed.

Go back to your browser and go to http://IP_Address:88/ and the ActiveX blocking window will be slightly different…it now displays the camera company manufacturer name.  Accept whatever prompts are required, enter your username and password and you should be able to see the entire interface.

Any more problems are issues, feel free to submit them on our Contact page at http://www.americanspecialprojects.com.  If you use the chrome browser try our SIP telephone contact number.


reg server
Register The OCX File

new warning which means success
Success!!! This new warning screen means that you have successfully registered the FOSCAM DirectX / OCX file.


expand fsipcam
Expand the FSIPCam.cab file


Be sure to select "Save as" and save to c:\windows\temp
Be sure to select “Save as” and save to c:\windows\temp

see the URL as "Program Location"
Do you want to allow the following program from an unknown publisher to make changes to this computer?

Which Vacation Rental Service is Best? A Comparison of HomeAway, AirBnB and FlipKey

One of our clients, a property management company, recently ventured into the vacation rental market.  Based on our work with another client and personal experience we made recommendations on various vacation rental services they should use.  When I travel, I prefer to stay in a vacation rental versus a hotel for longer stays or when traveling with my spouse.  My experiences certainly played a role in helping to recommend which services to use.  While there are other services to choose from the three we use and recommend are HomeAway™, AirBnB™ and FlipKey™.

We developed a scoring rubric with 23 dimensions based on an 85 point scoring system (“our recommendations”.)  Certain dimension’s scores were weighted heavier than others; and the score assigned to the service when the score exceeded 1 point are subjectively assigned.  A secondary performance rubric (“success test”) was created using the original 23 dimensions plus a 24th dimension that measured the actual success in vacation rental bookings.

My personal observation and preference for a service is HomeAway™ because they have really good customer service, deposit money into the owner’s bank account when it is received, and has a mature dashboard.  Getting the money when the tenant pays is a huge plus for me.

My original thought was that AirBnB would be the third place because I had personally had a very negative experience with them in Templeton, California last year.  However the only major detractor for this service is that it does not include the correct taxes in the rental fee.  My client was able to overcome the tax problem by including tax in the nightly rate.  Including tax in the nightly rental creates an in-balance because sometimes competitive property owners do not include taxes in their rates and AirBnB deducts a service fee from the included tax.  AirBnB could win first place if they fixed the taxation issue, deposited funds when they are received and had an easier to configure pricing system.  If “Bookings” was the only measure, then AirBnb was the clear winner.  AirBnB was responsible for majority of bookings on our client’s property (62%.)

I found the HomeAway customer service to be the most responsive.  AirBnB ran a close second place, although their stubbornness with regards to the taxes is most disappointing.  And FlipKey just took too long to respond.  In some fairness to FlipKey, they made significant changes to their dashboard and had other technical glitches during the testing period which might have caused excessive wait times in the customer service queue.

FlipKey (which is a Tripadvisor™ company) does a huge marketing campaign and is very well positioned for search engine optimization.  All you need to do to find a property in Phoenix, Arizona is type “tripadvisor phoenix az” into the Google™ search engine.

Comments on Subjective Criteria

Service Fee to the Guest – We ranked HomeAway the highest (4 points) because there is no service fee charged to the tenant.  Both AirBnB and FlipKey charge a service fee, but AirBnB’s is considerably less than FlipKey’s so we gave a higher score to AirBnB.

Merchant Charge – All of the services charge something to the owners for the merchant fee.  HomeAway charged the highest rate so their score was lower.

Tax Included / Correct – HomeAway properly computed taxes and itemized it correctly on the quotes and invoices.  FlipKey included taxes but incorrectly did not compute taxes on taxable fees (e.g. cleaning).  AirBnB scored zero because they do not include taxes and receive a booking fee on nightly rentals which include taxes.

Picture Count – HomeAway limits the pictures displayed to 24 which earned it the lowest score.  I would have scored them a “5” but bumped them to “7” because they have an easy to use picture management system.  AirBnB and FlipKey seem to have an unlimited number of pictures.

Review System by Guest – AirBnB’s approach as a social scoring and reviewing system is unique and easy to use.  This earned it the highest score in this category.  Also, AirBnB is the only service that allows the owner to rate the tenant, so I scored them the highest in that category.

Easy to Use Rates – FlipKey’ rate system was the most intuitive and easiest to setup.  AirBnB offered too much flexibility and HomeAway did not offer enough.

Services use of SEO – FlipKey was the hands down winner of SEO and TV advertising.

Customer Base – AirBnB’s customer base is huge, so I turned the volume up to “11” for this rating.

Background on the Services

HomeAway (AWAY NASDAQ) was founded in 2005.  It has more than 1 million properties listed in its system.  It is headquartered in Austin, Texas.  HomeAway™ is a trademark of HomeAway.com, Inc.

AirBnB (private) was founded in 2008.  It has more than 800,000 properties listed in its system.  It is headquartered in San Francisco, California. AirBnB™ is a trademark of Airbnb, Inc.

FlipKey (a TripAdvisor company, TRIP NASDAQ) was founded in 2007.  It has 300,000 properties listed in its system.  It is in Boston, Massachusetts. FlipKey™ is a trademark of FlipKey Inc.

Conclusion

In our recommendations and in the success test HomeAway™ was the clear winner because of its many features that makes it better suited for commercial vacation rental ownership.  FlipKey™ and AirBnB™ tied for second place on the recommendation rubric.  Despite FlipKey’s slick features and huge marketing budget it failed to beat out AirBnB on the “success test” rubric.  AirBnB on sheer customer numbers and booking strength bested FlipKey to pull in second place in the performance rubric.

Our ranking overall is 1st HomeAway, 2nd AirBnB and 3rd FlipKey.

We have not been asked to provide commentary on these services by their respective owners so we have no conflict of interest with this blog.

Rubric
Comparison of HomeAway, airbnb and FlipKey